Tuesday 30 April 2013

The Upside Down French Plait Tutorial


Hi guys, my name’s Amber and today I am going to be showing you how to create the upside down French plait hairstyle. This hairstyle is totally on trend at the minuet and celebrities all over the world are currently rocking it!

What You Will Need:

Paddle Brush
Tail End Comb
Hair Grips
Hairspray

Step 1
Using a paddle brush, brush your hair to make sure that it is free of any knots.

Step 2
Flip your head upside down and brush all your hair over.

Step 3
Using your comb, section off a layer of hair at the bottom of your head.

Step 4
Begin to French plait the hair until you reach the crown of your head.

Step 5
Gather the remaining hair together and twist it into a bun. Secure in place using hairgrips.

Step 6
Spray hairspray all over your hair to secure it in place.

And there you go, the finished look, doesn’t it look lovely?

Now there’s only one thing left to do…find an excuse to go out so you can show off your lovely hair!

 photo Signiture_zpscfdfc490.jpg


Sunday 28 April 2013

Exciting changes to the etailPR Blogger Network!


Over the past week, we have been making some exciting changes to the etailPR Blogger Network. We have added more information about how the process works and we have been preparing the network to have more live brands!

Each blogger who has signed up to the network or has worked with etailPR (received samples from us) has their own profile page complete with your personal details. In order to make the most of the Blogger Network, you need to ensure that as much detail is filled in on this page as possible. All of this information will be available for brands to see - it will influence their decision on whether to accept your application to their campaign or not. There will be lots of bloggers requesting to work with brands, so you need to make sure that your profile stands out in the crowd!

We are recommending that you prepare your profile area as soon as possible and make sure that this information is filled in, so that when the brands are using the network fully, you will be ready to go and start applying! This will all be happening really soon, so please make sure you do this as soon as possible - log in here!

If you have worked with etailPR, but haven't logged into your account before, then please click 'Forgot your password?' and enter your blog email address. Any problems, just get in touch! You can access the log in page here.

If you haven't signed up to our network yet, then you can do so here.

Saturday 27 April 2013

Create professional looking product photos with (almost) no equipment!

How To Create Professional Looking Product Photos With (Almost) No Equipment

Need to take studio quality photos of clothes and accessories? (Yep.) Don't have a photography studio? (Nope. Not to worry - with a few clever know-hows you can easily take crisp, well-lit photos on lovely clean backgrounds with no specialised photographic equipment; I'll show you how in today's Photo Tips Friday post!  So there may come a time when you will need to produce a great still life for a project you're working on, or perhaps you need to take them regularly. Some possible situations you will need these photos for would be:
  • Selling products in your Etsy shop or on your website
  • Selling your unwanted items on eBay
  • Creating outfit or "look" posts on your blog - but with what you own already
  • Product reviews on your blog for items you've been gifted
  • Creating a virtual closet organiser à la Cher from Clueless (for the mega-organised amongst us!)
The photos above of my (own) shoes, necklace and sheer top were taken... Without studio lights Without a mini photographic studio (homemade or shop boughtand Without using Photoshop. I used this method to create this image of all my clothes and accessories on my post 10 Ways To Wear: Work Outfits if you want to see it utilised in one of my blog posts.

In a nutshell, all you need to do is simply photograph your objects on a pale, seamless background in bright, diffused daylight (i.e. not direct sun), then clean up around the edges using a free editing website like PicMonkey... that, lovely readers, really is all there is to it - I promise you!


I will, of course, take you through the steps and give you some little tips that will make all the difference to the quality of your product photos. If you're still interested, read on!

............................................................................................................


What you need to know before you start

Now I know I said "almost no equipment" - you will of course need some things to help you in this task; what I mean is that you don't need any specialised photographic equipment or editing software. I have had to assume that you have access to or own a camera(!), a basic tripod and a couple of things from around the house / things that can be picked up very cheaply from the local shops.

Please note I have photographed the items with my DSLR camera. I know not everyone has one, but for these types of photos they really are the best ones to use. Because you're photographing objects in close-up, so you want (and need) to see all the tiny details - so the higher the image resolution available to you and the better quality lens you use, the better.

Also, using a standard lens (not a wide angle), either on a DSLR or a compact (point-and-shoot) camera, will avoid any distortion of the object. If you're using a compact camera, make sure you zoom in and move further back. Don't use the wide-angle setting.

Finally, before I start, please don't think I'm saying the mini photographic studio tents you can buy or make aren't worth getting - they are! This is merely a way to do it quickly when you haven't had time to sort out that little studio of your own, or you simply won't get enough use out of one to justify the cost or time spent making one. You sometimes need to buy lights or daylight bulbs as well to get the best results, so that's yet another expense right there... I'm trying to keep the cost to a minimum for the purposes of this exercise.

What you will need

So, you will need some of the following: Photo Tips: Create a Photo Studio at Home 1. Camera remote control* (optional, £5 to £20 depending on camera model and retailer)
One of the following tripods:
2. Gorillapod (between £12 and £25, depending on the weight of your camera)
3. Mini tripod (£5 to £20)
4. Heavy duty tripod (£100+)... or borrow one from someone you know who owns one (much cheaper)
5. Long white roll of drawing paper (about £5 to £10 from art/craft shops) - this is the one essential item
6. Paperweights / small heavy objects
7. External camera flash (optional)

Not pictured:
White/clear/inconspicuous coat hangers (available in most households) Plain, pale wall with at least 6 feet of clear space in front A camera (of course) Bright, natural daylight (FREE!)
*sorry, I only had the empty box when I came to photograph this - my bad. I've shown you four set-ups to demonstrate how I photographed the above items - there's four set-ups because one didn't work very well (you'll see why as I've shown the results of that one too, and what I did to improve it).

Home Studio Set up #1 - clothing
Using: Plain wall, Coat hanger, Wall hook, Tripod

Create Professional Looking Product Photos With (almost) No Equipment You can see from the snapshot above it really is just hung on a hook on the wall - this is in an unused office at my work. As it's a mostly empty room, I have the space to step back from the wall to get the top well within the frame. I took the photos on a bright day, but out of direct sunlight.

The reason you'll need a tripod is that most rooms have walls - solid walls. Unless you're lucky enough to have floor to ceiling windows or a fully glazed conservatory, the amount of daylight coming in won't be enough to completely avoid camera shake.

This is the easiest set-up:
1. Iron the item of clothing if it's prone to creasing - every crease will be magnified photographed like this
2. Hang the item of clothing on a hook on a pale wall (patterned wallpaper will not work)
3. Arrange the item so it hangs as nicely as possible
4. Set the camera up on a tripod level to the item - don't look up at it or down on it
5. Leave plenty of "empty" space around the item (don't crop at this stage, you'll see why below)
6. Use the remote control if you have one to minimise camera shake.

My results were as below: Create Professional Looking Product Photos With (almost) No Equipment I used PicMonkey (a free editing website that has a ton of basic and special effects you can use) to clean up the original image. The steps I used were:

Effects > Dodge Choose a medium brush - don't go too small - and choose the "light" option. Dodge will lighten the image in specific places - if you're patient and go round and round the item lightening the shadows (leaving a little shadow around your item, don't go too close), the edges will eventually go to white. Remember to unclick and reclick your mouse now and then - if you go round for ages and then accidentally go over the edge of the object, you will have to Undo, but you'll undo lots of lightening. Lighten in short sharp "bursts".

Effects > Clone This will duplicate any area of the image you have preselected with the clone brush; here I wanted to erase the coat hanger. By using a medium size brush to clone a general area, then zooming in and using a much smaller one to go right up to the edges of the top, I was able to erase all traces of the hanger very cleanly. This tool takes a little getting used to but it's worth a bit of practice.

Effects > Crop This is an easy tool to use, and it has a grid should you need to centre the object (always a good idea). Always crop the image last, because if you're trying to dodge out the shadows when it's already cropped, it's hard to stop the brush lightening the object as well because you've little room to manoeuvre the brush around the edges. Want to see the final image in high res? Topshop colour block leopard print top SS11 Not bad for a top simply hanging on the wall of a plain room in natural daylight!

Home Studio Set up #2 - shoes or accessories
Using: Paper roll, Paperweights, Gorillapod, Chair or similar (on which to attach the Gorillapod)

Photo Tips: Create a Photo Studio at Home The steps to setting this up were: 1. Drape the roll of paper from a tabletop onto the floor and use a weight at the top and bottom to stop the paper curling up 2. Don't make the paper slope too tight or too baggy as it drops down - it needs a nice, gradual slope to it 3. Place the object a little in front of the slope and arrange into a pleasing shape if necessary 4. Set the camera up on the tripod, or, as I've done here, attach the camera to a chair leg or arm using the Gorillapod You can see how I have set up the roll of white paper in the photo above. What you need to recreate is a background without any definite edges, because those create hard shadows which are unattractive and almost impossible to edit out. So my results were:  Create Professional Looking Product Photos With (almost) No Equipment Very little editing was needed here:

The steps I used in PicMonkey were exactly the same as I used for the sheer top (except for the clone which wasn't required). The reason for creating a completely white edge around the frame is so that when it's placed on a composite image or other white background, you don't see a hard edge of shadow where it's darker than pure white and it'll blend in perfectly. As long as it's pure white around the very edges, you can get away with some shadow (and you need some so that the object doesn't look like it's floating) and the result will be much more professional-looking.

(I have created a "shadow frame" in Photoshop in the composite images with the text simply to make it more obvious where I've cropped them. PicMonkey has similar frames you can add if you require them at any time.)

Final image in high res: Leopard heels

Home Studio Set up #3 - jewellery (failed attempt)
Using: Paper roll, Paperweights, Mini tripod

Photo Tips: Create a Photo Studio at Home

This is the first set-up I used for the necklace. Using the paper roll in the same set-up as the shoes, I used the mini tripod just as an alternative to the Gorillapod for the purpose of this post. Both worked fine.

This shoot, however, was not at all successful because I had the light coming from behind me, so the light went from the bottom of the necklace up, and for this style of chunky necklace it didn't work as all the detail was lost. The shadows looked strange - when you wear a necklace the light source will be mostly from above, not below. Also there was little contrast between the necklace and the background (paper). Create Professional Looking Product Photos With (almost) No Equipment Although I knew at the time of shooting it wasn't working (and changed the set-up), I later used the PicMonkey tool Basic Edits > Exposure > Brightness anyway to see if it could be salvaged by lightening the image evenly all over.

I cleaned up the edges to white, but it still doesn't look as good as the second attempt (below). It proves that sometimes you have to recognise when something isn't working and shoot an alternative so you have more options when it comes to editing and choosing the right image.

So I changed it to a more basic set up, this time right in front of the doorway so the light flooded in from "above". I didn't really need to slope the paper to create more white background as the necklace is flat...

Home Studio Set up #3 - jewellery (successful)
Using: Paper roll, Paperweights, Heavy duty tripod (I was able to look down from above on the necklace with this one)

Photo Tips: Create a Photo Studio at Home

Ironically, for a much simpler set-up, the results are much improved on the previous attempt: Create Professional Looking Product Photos With (almost) No Equipment The lighting angle is better and shows off the detail beautifully, so much so that the original needed very little editing as you can see between the original and the edited version. And here is the final image in high res: Necklace Like the last two, for an item just arranged on white paper in diffused daylight, this is a very well-lit and detailed shot (and much more successful than my first attempt). It would be more than good enough for an Etsy shop or marketing purposes.


............................................................................................................


A few notes on these tips...

Hopefully you can see that the main trick to getting the backgrounds white (in order to reduce the amount of whitening of the edges required) is to get as much daylight onto the white paper as possible - it simply bleaches the paper and not the object. Other than that, keeping the camera steady and leaving a fair amount of excess white around the edge of the frame is all there is to it.

One thing I haven't addressed is what type of camera to use. As you can see from the set up pictures, I used my DSLR with the same fast, standard (50mm) lens I use for all my outfit photos. If you're shooting indoors, what you need is a camera that works well in low light, because if you're inside you'll still lose a lot of the brightness that you get being outdoors. Why not try taking your studio outside? If you live in a country blessed with dry weather (that's the UK out, then), you can recreate it outdoors but make sure you don't place the object with the sun shining directly on it. Make sure it's in some shade or you'll end up with harsh shadows.

It may even be worth trying your phone or tablet to take the pictures: the photos I took of the studio set ups (with my DSLR in the picture) were taken on my iPad. The photo quality is excellent, and I've noticed that it takes pin-sharp photos of things very close-up - something you rarely get with a compact camera unless you use the macro setting. But find out how to zoom in with these devices as you want to avoid the distortion that you get with the usual wide angle setting they have.

I didn't mention the flash pictured in the equipment photo - at the beginning of the shoot I wasn't sure if I'd need it (turns out I didn't). Although I won't go into detail about using flash here, you have to be very careful using a camera's built-in flash as it generally creates a deeply unflattering, harsh light with hard shadows to one side of the subject. I really wouldn't recommend using flash for this type of shoot - wait till you have more daylight. (The flash I was considering using was my ring flash, which creates a diffused, even light and is designed for close-up photography. Use of flash is maybe for another time.)

Above all, experiment. As I've shown, I don't always get it right first time so be prepared to accept it's not as good as you want it and change things.

Got any questions? Leave me a comment below, or you can tweet me /follow me on Twitter (@notlamb) - I'd love to hear if this has been of any help to you guys!

Hope everyone has a great weekend
Catherine x 

Thursday 25 April 2013

Celeb Style: Emma Watson


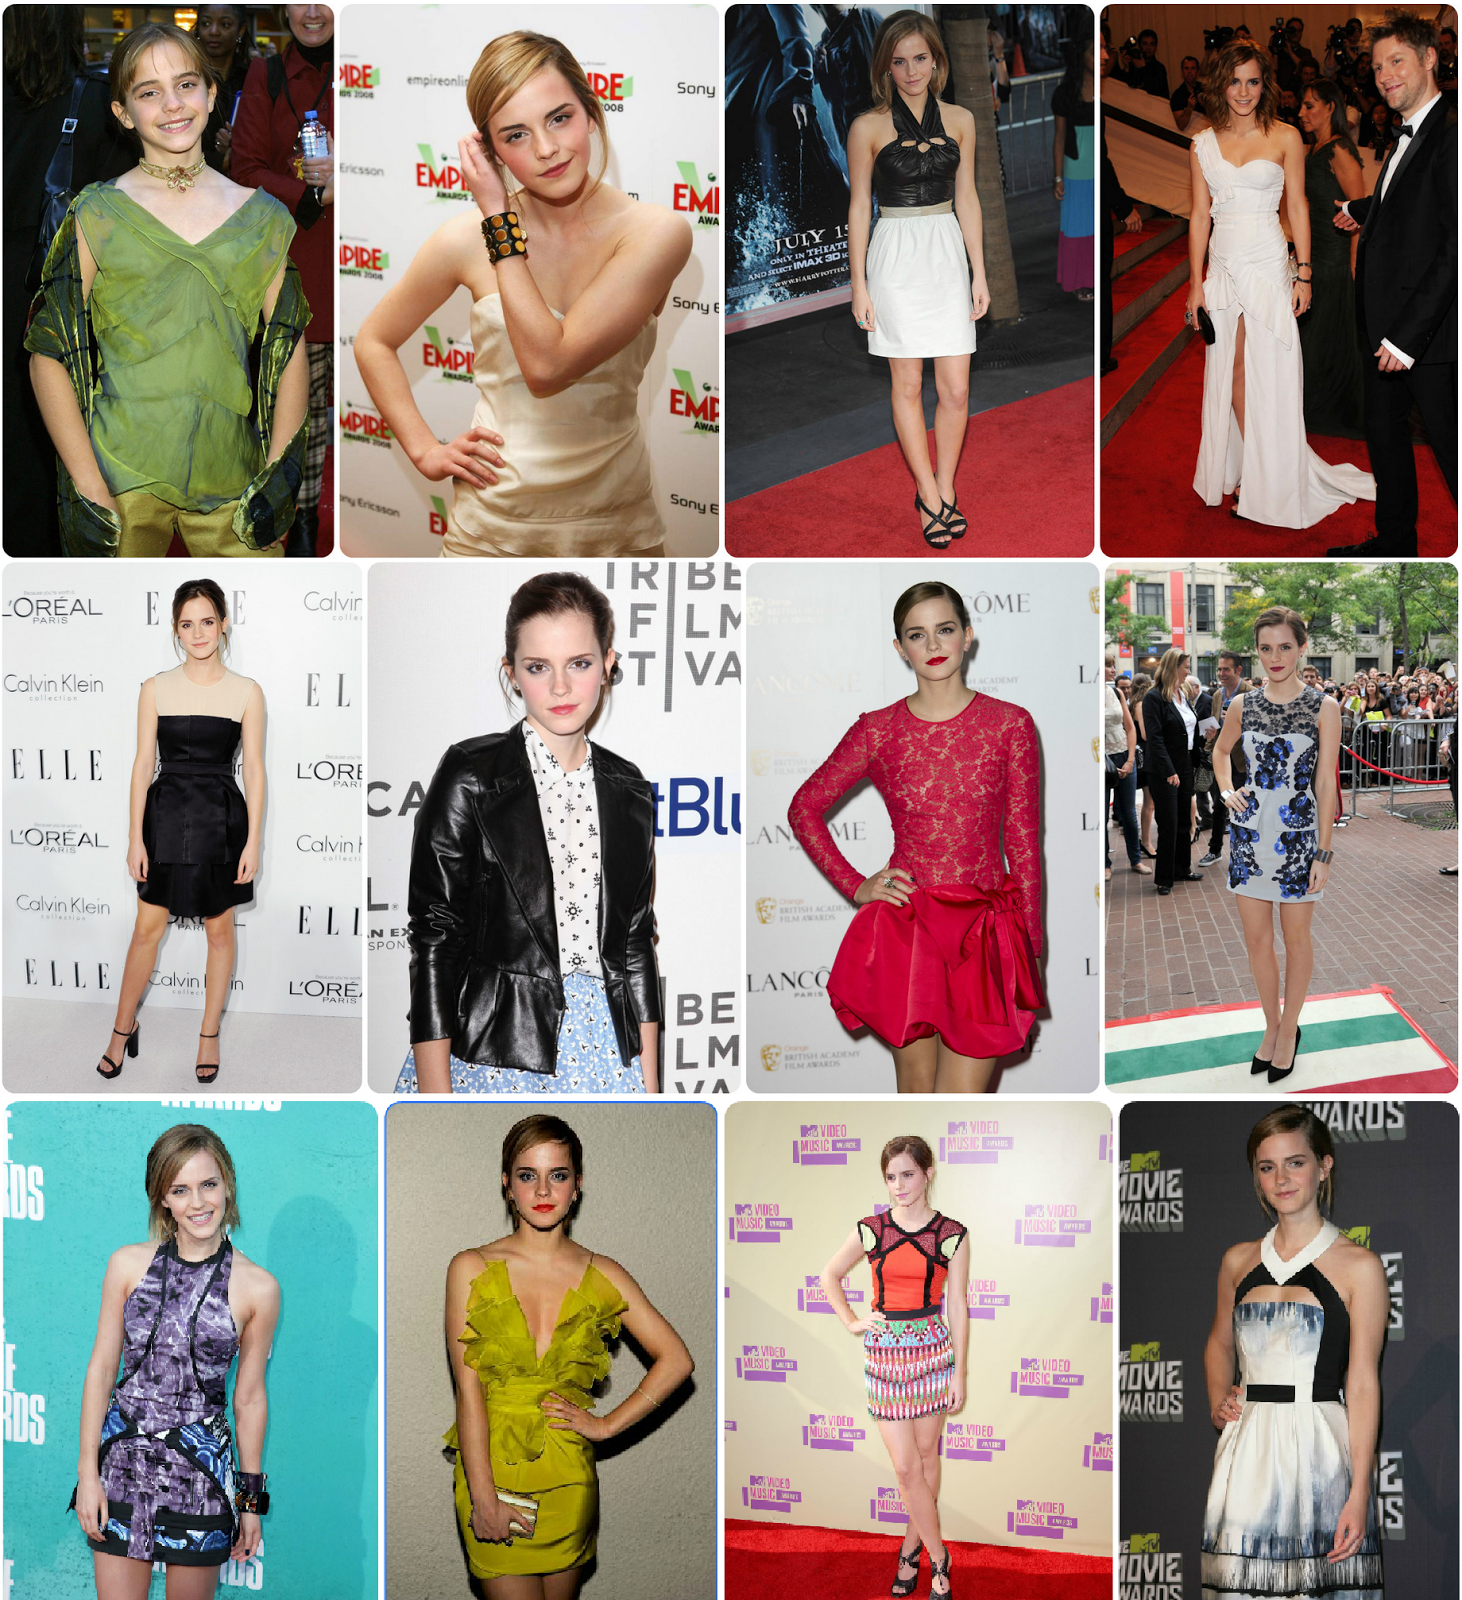
As she has just turned 23, this is the perfect time to take a lot at Emma Watson’s magical style transformation though the years.


Miss Emma Watson has certainly come a long way from her first Harry Potter premiere all those years ago and now she has the whole world watching her every sartorial move.

From gawky witch to fashion icon, we have seen Emma’s style blossom over time. Now she exudes effortless style and poise on the red carpet; always topping best dressed looks, never making a fashion faux pas. But dressing classy is never boring or frumpy - it's the daring twist on her sophisticated personal style that sets her apart from the pack.

While she may have said that "there's nothing interesting about looking perfect", she is rarely photographed looking anything less, but it’s a refreshing attitude for a young starlet to have – something which makes her so endearing to her fans.

All those fabulous red-carpet choices have caught the attention of serious fashion heavyweights such as Karl Lagerfeld (who photographed her), she has modeled for Burberry and has been signed to Lancôme – creating her own perfume and modeling a new range of lipsticks. She has also had the privilege of being able to wear many items fresh-from-the-runway, which is not afforded to many. Many people don’t realize that Emma was actually born in Paris, perhaps that explains her love of Chanel, Zadig et Voltaire, and Lancôme.

While she has been keen to shake off her clean cut Harry Potter image and has taken on some more risqué film roles, she still maintains her classy, understated style. Burberry’s Christopher Bailey described her as "a great character and a modern edge" which I think sums her style up perfectly, she always dresses chic but is definitely taking more risks with her red carpet choices.

Photos of Emma feature in a new photography book by James Houston, which has ‘the goal to raise awareness and funds for the environment and sustainable living’. Emma looks stunning in the photographs and has stated she owes her fabulous figure to yoga and going for walks in the park (there’s hope for the rest of us…!).

Emma has said that her beauty mantra is  “Believing in yourself, being self-confident, it makes you look beautiful. That was Audrey Hepburn’s case.” And with regards to clothes, she always underlines how important she thinks it is to have fun and enjoy the fashion you wear.

She showcases timeless elegance with a modern twist, and is a perfect English Rose. This fashion darling is certainly here to stay and will continue to make waves in the fashion world.
  

Wednesday 24 April 2013

Wednesday Wishlist: Motel


I don’t know about you, but week after week I find myself creating endless lists of items that I’m currently loving and would somewhat wish to add to my wardrobe. This week’s wishlist comes from none other than Motel Rocks. As you can probably tell, the pieces I chose have a 90s feel to them, a trend which I’m very excited about.

Motel Lomas Sleeveless Playsuit in Black                 
What I mostly love about this playsuit is the fact that it can be dressed up or down. For a day time look, it can be worn with a denim jacket, flats and maybe a studded satchel. When it comes to night time, this playsuit can be worn with a salt and pepper jacket and chunky heeled boots. A gold or silver chunky chain necklace would finish off the outfit perfectly.

This tee is perfect for the coming Spring/Summer season, and would look great tucked in black denim hot pants or black high waisted jeans. Team with a pair of cut-out boots and bright red lips, and you’re ready to go.
 
This black denim jacket is very grungy, and that’s one of the main reasons why I fell in love with it the minute I saw it on the Motel website. I would definitely wear it with a plain white tee, black denim jeans and black boots. To accessorise this outfit, I would opt for a number of silver above the knuckle rings, and maybe a ying yang charm necklace to continue with the grungy and monochrome look.

This blue paisley print playsuit is not something I usually wear (in terms of colours) as I generally tend to wear dark and monochrome pieces rather than light coloured ones, which I’m sure you realised by now! I am allowed to dress in a more ‘girly’ way sometimes though, right? This vintage inspired playsuit would look great worn with just a pair of sandals and no jewellery, so that all the focus would be on it’s lovely print, colours, and cut.

The last item on my Motel wishlist is this tie dye print dress. I love how versatile it is, in that it can be worn as a dress, as a tee tucked into a pair of trousers, shorts or skirt, or even worn as a long tee. I would probably prefer to wear it as a dress though, and would team it with my all-time favourite pair of boots – the Jeffrey Campbell Everest. Again, I wouldn’t wear any jewellery with this dress as there’s already so much going on with its pattern in my opinion.

What do you think of this wishlist? Are any of these items on your wishlist too?